Why I got an amateur radio license

Success! I officially have my amateur radio license.

Of course, you might be asking: what does this have to do with rockets? A fine question.

a mobile amateur radio
a fancy mobile amateur radio

One of my goals for 2020 was to get an amateur radio (aka “ham radio”) license from the FCC. I knew literally nothing about ham radio, and I still know exceedingly little. But as I started learning more about the electronics in rockets, I discovered that you are legally required to have this license in order to use certain flight computers, such as the one I bought and recently installed (the TeleMetrum, from Altus Metrum) in my electronics bay, since you are transmitting via radio. And even if it weren’t strictly required, it would certainly be helpful to know some basics about electronics and radio waves.

Just as an aside, rocketry is an even better hobby than I initially thought it’d be. It really requires you to learn not only about different aspects of rockets, but also a lot of the basics in many rocketry-adjacent fields.

What am I talking about? Well, this is a good example: in this case, I discovered amateur radio. Prior to this, I hadn’t really given it much thought. But given that electricity and radio waves are the foundation of our entire modern technological society, it doesn’t hurt to know a bit more about it.

I’ll probably put together a separate post just on some of the content required for the exam, a sort of amateur radio 101, but just as an example: I hadn’t realized that cell phones and wifi are simply ultra high frequency (“UHF”) radio waves, fundamentally the same thing as VHF and UHF broadcast television channels or AM and FM radio channels. Some of this was pretty interesting stuff, although other areas just involved rote memorization.

Anyway, there are three levels for the amateur radio licensing exam. The FCC officially manages this entire process but farms it out to local clubs across the country and their volunteer examiners. You can apply for the following types of licenses:

  1. Technician
  2. General
  3. Extra

Each license requires passing an exam that is progressively more difficult, but each entitles you to additional rights and privileges when using amateur radio frequencies. Everyone who gets any amateur license is also assigned a unique “call sign” by the FCC, some combination of letters and numbers, often starting with a W or K (which is also why radio and TV stations have these broadcasting abbreviations, like WJMK or KSCS).

Four books on ham radio
exciting weekend reading

I studied for the technician license and (fortunately) passed that exam, in Redmond, WA through the Lake Washington Ham Club. I took out a few books from my local library and studied for a weekend, taking some practice exams online.

I only really need the technician license, so I’ve checked that box and can bring my focus back to rocketry, but I could see potentially taking the additional exams for the general or extra class down the road at some point. That said, it would require a significant amount of additional studying.

So long story short, the FCC notified me that my license was granted and assigned me a unique call sign: KJ7LRF.

Now to complete the electronics bay for my rocket – and I can finally begin using this flight computer.

What to see at the Museum of Flight in Seattle

I recently had a chance to visit the Museum of Flight in Seattle for the first time – long overdue, in fact, since we moved out to the area more than 18 months ago. It was an impressive place with some great exhibits. In particular, we spent most of the time in the Charles Simonyi Space Gallery, although there was much more to see.

This also comes on the heels of my recent trip to the Henry Crown Space Center at the Museum of Science and Industry in Chicago.

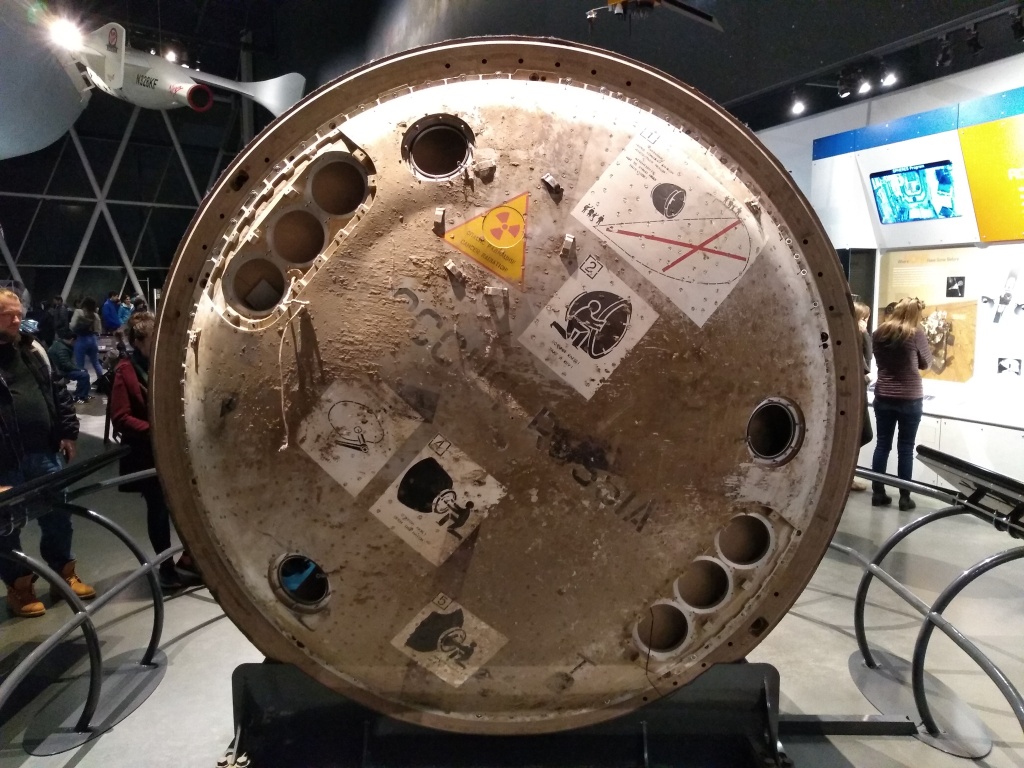
Soyuz (Russian) descent module

One highlight was an actual module from a Soyuz spacecraft. Soyuz was the human spaceflight program in the Soviet Union (and continues today in Russia), and the Soyuz rocket and spacecraft were integral parts of this program. Interestingly, the Soyuz rocket is the most reliable launch vehicle, as well as the most frequently used launch vehicle, in the world. The first Soyuz manned capsule was used in 1967, and Soyuz flights have taken place more than 1,700 times since then, in both manned and unmanned missions.

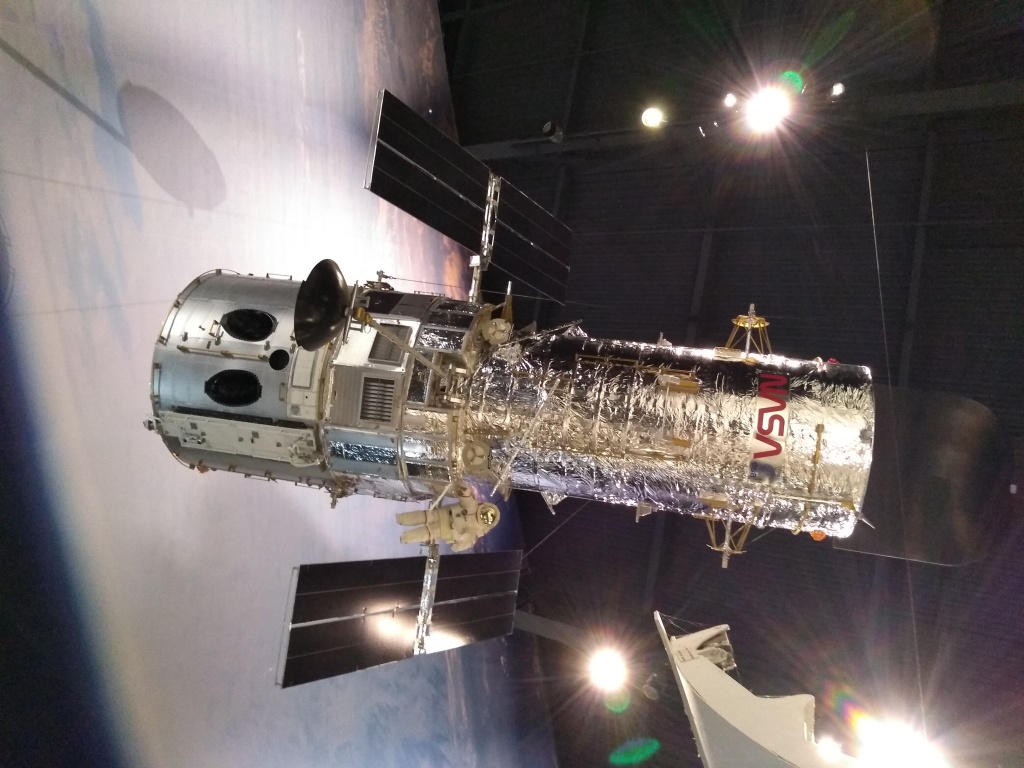
Life sized model of the Hubble telescope
The Hubble telescope

The exhibit also had some life-size models of things like the Hubble telescope and even a life-size space shuttle that you can climb aboard. Pictures (such as the Hubble, above) obviously don’t do the size of these things justice, although the relatively small floating astronaut next to the telescope helps provide a sense of scale.

The Hubble telescope is of course extremely well known. It was launched into low earth orbit in 1990 and remains in operation today – 30 years later! – and it’s produced countless amazing images of the cosmos.

One thing that I didn’t know was that the Hubble is expected to last until 2030, or perhaps as late as 2040, and that its successor is the James Webb Space Telescope, scheduled to be launched in 2021 – from an Ariane 5 rocket. What a time to be alive!

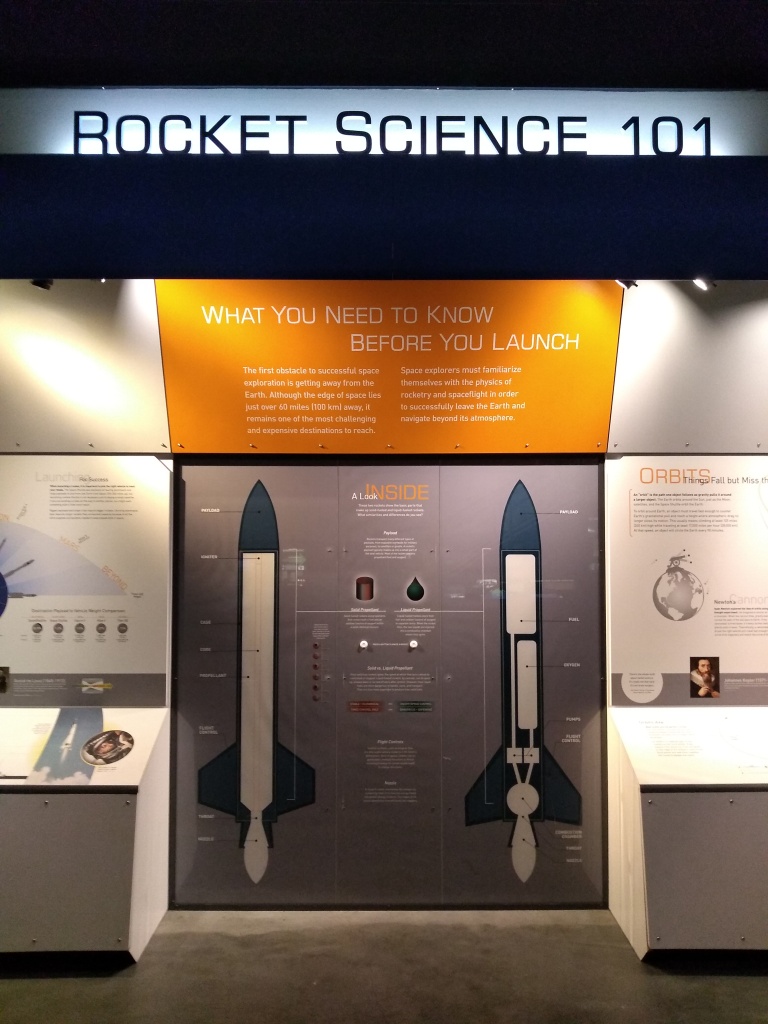
Museum display titled Rocket Science 101
Rocket Science 101

The space gallery also had a variety of other exhibits, including some interesting info about how rockets work, differences between solid and liquid fuel rockets, and displays related to the world’s largest rockets and orbits. I’m no expert on any of this, and I really enjoyed this “Rocket Science 101.”

I only included a handful of pictures here, but for more, you can check out my Instagram.

The Museum of Flight really has a lot of other exhibits to see as well; in fact, it’s primarily dedicated to aviation and airplanes (e.g. from the early days of flight and the World War I and II era), with only a smaller space dedicated to spacecraft and rocketry. But it’s absolutely worth a visit, whether you live in Seattle or next time you’re visiting.

Why metal beats cardboard: life lessons from playing rock, paper, scissors

The rocket construction is complete, but there’s one minor issue I still need to address. The rocket has a 54mm motor mount tube, meaning I need a 54mm diameter motor to fit inside. But I couldn’t find any H or I level motors (note: for the level 1 certification flight, the motor must be an H or I) that are 54mm. I could only find 38mm motors.

ENTER: THE MOTOR ADAPTER.

38 to 54mm adapter: cardboard
adequate adapter

The motor adapter is exactly what it sounds like. It allows you to adapt a motor of a given size to a differently sized rocket.

You can always use a smaller diameter motor in a larger rocket as long as you get an appropriate adapter; in my case, I just need a 38 to 54mm adapter. It’s like using a booster seat at a table if you’re too small for the seat. (Important corollary: if your motor’s diameter is too large for your rocket, you’re simply out of luck, and at that point you just need to build a bigger rocket.)

The rocket is made from durable and reinforced cardboard, so I figured a cardboard motor adapter would be sufficient. And it probably would be, but I wasn’t satisfied.

38 to 54mm adapter: aluminum
indestructible adapter

The cardboard adapter was extremely durable and fit perfectly. I had no doubt it would keep the motor properly centered. The only issue was retaining the motor – i.e., keeping it from falling out the bottom of the rocket. And not just falling, but forcibly ejecting out the bottom after the motor has burned through all its propellant and the explosive ejection charge happens at the other end.

I’ve explained this before but just to recap the serious danger: ideally the motor stays put, and the hot explosive gas at apogee forces the rocket sections apart (deploying a parachute). But if the motor isn’t properly secured, what can happen instead is the motor itself ejects and falls out the bottom. That’s bad. Even worse is the fact that the rocket didn’t separate as a result, and the parachute didn’t deploy, meaning now the entire rocket will come crashing down.

Retaining the motor is a big deal.

I did try attaching some small metal retaining clips, but I wasn’t confident they would hold under extreme conditions.

In light of this concern, I upgraded to a machined aluminum adapter. It’s more expensive, but the primary advantage here is that it looks fancier. Also, this adapter has its own retainer, so there’s no worrying about the motor ejecting out the bottom at apogee. Things will work as intended!

Rear (aft) view of a rocket, with aluminum adapter and motor retainer
The business end of a rocket

One other nice feature is that the 38mm adapter and its retainer fit perfectly inside the larger 54mm retainer. This allows both to be used at the same time for smaller motors, or alternatively, the adapter can easily be removed and the 54mm retainer can be used solo for larger motors.

I think I’ve exhausted this topic. In summary, metal > cardboard, and retainer > no retainer.

5 simple ways to turn a garden shed into a workshop

As I get more into building larger rockets, I’ve been increasingly aware of the limitations of my work area. Specifically, I don’t have one. We have a fairly small house and there’s no dedicated space for gluing or drilling or doing anything with large parts. I’ve had to temporarily co-opt our dining table.

We do, however, have a mundane shed in the backyard. It’s in good shape, but it’s dark and dirty, with no windows or any natural light, no electricity, and is generally just full of old junk that came with the house. But it has potential.

Blue shed
Run of the mill shed

I decided one of my goals for 2020 is to convert this shed into a useful workshop, primarily for rocket-related projects. This is just the first of a series of posts documenting the process of transformation and the resulting workshop.

This is kind of a big project, so I’m breaking it down into a few major concepts or steps:

  1. Remove junk & clean.
  2. Install windows.
  3. Replace door.
  4. Install new countertop work surface.
  5. Add electrical wiring for light fixtures and outlets.

This isn’t necessarily a comprehensive list, but I think that once I complete each of these parts of the project, it’ll go a long way towards making this a practical (and really cool) workshop. And then I’ll give it a name to class it up, like the Rocketshop.

Okay, still working on the name.

How to cause a fiery explosion

I’m getting all the parts together to build an electronics bay for my first high power rocket. Totally winging it here.

An electronics bay in a rocket, capable of dual deployment of parachutes, requires a couple of things: a flight computer or some similar electronic chip; a battery to power the chip; an electric match or igniter; and some explosive black powder. And, of course, some additional cords and pieces needed to wire everything together properly.

The basic idea is that the flight computer activates a “pyro charge” at the appropriate time. This electrically ignites the match, which in turn creates a spark inside some very tightly packed black powder. Which explodes – with some real verve.

It’s not as crazy as it sounds. The explosion and resulting expansion of hot gases causes the rocket body to separate at a pre-planned location, and a parachute deploys, assuming all goes well.

Firewire initiator, aka electric match
red end goes bang

This is a “firewire initiator” from MJG Technologies. In other words, it’s an electric match.

Apparently the federal Bureau of Alcohol, Tobacco, Firearms, and Explosives (“ATF“) generally regulates electric matches and igniters, but this is the only non-regulated version on the market. It’s made specifically for rocketry.

I previously uploaded a quick video of me testing one of these, but the real fun will be combining it with the compressed black powder, for one of your more vigorous explosions. Stay tuned for more ground testing.

5 reasons to put electronics into your rocket

I’m just beginning to learn about the different kinds of electronics that can go into a rocket. It seems like there are virtually limitless possibilities, but I’ll give a quick overview below.

TeleMetrum v3.0 flight computer chip sitting on stone backdrop
TeleMetrum v3.0 flight computer

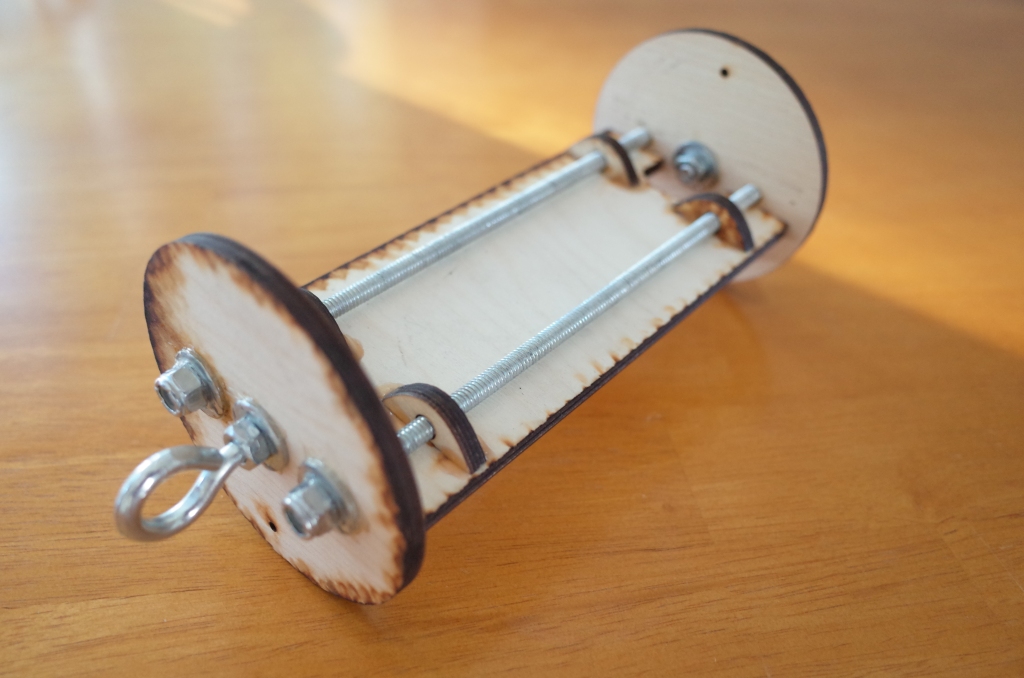
A high power rocket often has an electronics bay (“e-bay”) or some payload area where you can put various types of payloads, generally electronics.

The options are really endless, but just to help provide some overall context, here are a couple of the major types or categories of electronics that can go into a rocket.

An empty electronics bay made of wood with metal screws and rods
An empty e-bay
  1. Altimeter. This is a simple device that measures altitude, or height. It uses changes in barometric pressure to determine height (starting by setting it to zero at the launch site, so that it has a starting point). It’s fun to launch a rocket, but it’s nice to know exactly how high it goes. I’ve heard great things about the RRC3 from MissileWorks, for example, as well as the StratoLoggerCF altimeter.
  2. Parachute release. If you wrap the parachute with a rubber band so that it’s closed tightly, it won’t automatically open when it’s released at peak height. By using a very small chip, such as the Chute Release from Jolly Logic, you can control when that parachute actually opens up and deploys.
  3. GPS/ radio beacon. It’s helpful to know exactly where your rocket goes, using something to record position data. It’s also helpful for finding your rocket after it inevitably disappears from sight and you have no idea where it landed. I’ve heard several people recommend the BeeLine GPS, for example, from Big Red Bee.
  4. Flight computer. This is a small chip (e.g. the one pictured at the top of this page) that integrates several useful functions into a single device. A flight computer generally contains an altimeter and GPS/ radio beacon, but also contains “pyro channels” which can control parachute deployment. A flight computer allows a rocket to “dual deploy,” meaning you can deploy two separate parachutes, and you have a greater degree of control over when the rocket parts separate and the parachutes actually deploy. The flight computer pictured above is the TeleMetrum, from Altus Metrum.
  5. Camera. Is there any limit to how creative you can get with putting electronics into a rocket? Not really! I’ve just begun to scratch the surface, but I know people put a GoPro or other camera on the outside of the rocket and record video during launch, so that you see the earth receding underneath. For some of the biggest rockets, you can even glimpse the horizon and the edge of the earth’s atmosphere.

My initial goal is to just figure out what I’m doing (I have no experience working with electronics) and put together the basic parts to create a functional e-bay with a flight computer. This is one of my 2020 goals – and specifically a January 2020 goal because I have a lot more to do this year.

What to see at the Museum of Science & Industry in Chicago

When I was visiting family in Chicago for the holidays, I got a chance to check out the Museum of Science and Industry (“MSI”) and in particular, the Henry Crown Space Center. I was born and raised in Chicago and I’ve been to MSI many times when I was younger, but it’s been a few years now. They’ve remodeled and changed exhibits countless times, and I can’t remember having seen the space center before.

Aurora 7 capsule on display from Project Mercury
Aurora 7 capsule (Project Mercury)

Needless to say, it was awesome! There are areas dedicated to each of the major US human spaceflight programs, explaining their purpose. These programs and their stated goals include:

  • Project Mercury (to orbit a manned spacecraft around earth, to investigate humans’ ability to function in space, and to recover both person and spacecraft successfully),
  • Project Gemini (to rendezvous and dock two spacecraft), and
  • Project Apollo (to land men on the moon and return them safely to earth).
Apollo 8 module on display
Apollo 8 module

As pictured here, the exhibit included an actual manned capsule from Mercury and an actual module from Apollo. These were on loan to MSI from the National Air and Space Museum. There’s also a rock on display from the lunar surface. It’s really impressive to see these things in person; mind-blowing when you stop to think about it.

If you want to see more photos, check out my instagram, but I wanted to at least share some highlights from the exhibit on the blog as well. Chicago is renowned for its world-class museums, and MSI doesn’t disappoint.

Apollo lunar landing display
Apollo lunar landing

The space center also had some areas dedicated to modern and future space missions, including info about SpaceX (see picture below), Blue Origin, Virgin Galactic, and other private companies, as well as current NASA projects and plans.

Display model of SpaceX Falcon 9
From the past to the future of spaceflight

I’m enjoying launching model rockets and getting into high power rocketry, but it’s pretty inspiring to see a huge exhibit like this. It gives me motivation to set more rocket-related goals (and crush them) in 2020!

The goals that I forgot to mention

I listed my top 5 rocket-related goals for 2020 in my last post, but I am quickly realizing that an appendix is necessary.

Scrabble tiles spelling out "GOALS"

It’s not just that I feel the need to go into further detail. Sure, each of those goals I already listed can be (and needs to be) broken down into multiple sub-parts. For example, in transforming my backyard shed into a workshop, I need to do a couple of major things:

  1. clean it and haul out a bunch of junk;
  2. knock out parts of the wall, frame window locations with wood, and install windows for natural light;
  3. wire it with electricity by running conduit from the main power supply in the house;
  4. install new wooden countertop for work surface;
  5. install light fixtures;

…and so on. Each of these has sub-parts as well – you get the idea. That will be a decent sized project. But aside from my previous post, I also need to add a few extra things to my list of what I want to accomplish in 2020:

  • Write an “instructable” on how to build a high power rocket. One of the reasons I got into rocketry to begin with was that I came across a really good instructable on HPR.
  • Learn more about the laws and regulations governing spaceflight and rockets (manned and unmanned) and write and publish an article on this topic, maybe in a law journal. I was inspired by an article I saw on Politico recently.
  • Get an amateur radio (“ham radio“) license. I’ve never really considered this until recently, but it’s becoming increasingly obvious to me that having such a license would be extremely useful when adding electronics to a rocket, since the ground station communicates with the rocket via telemetry, through radio. In fact, I’ve been looking at the TeleMetrum flight computer recently for the electronics bay in my rocket, and to legally operate a TeleMetrum flight computer system in the US, you need at least a “Technician Class” amateur radio license from the FCC.

So.. I’d better get started!

New year, new me: Goals for 2020

Farewell, 2019. Bring on 2020.

I’ve only recently gotten into rocketry, so I feel like I’m moving pretty quickly. Prior to a few months ago, mid to late 2019, I’d never even built or launched any kind of model rocket, even a small one.

Fireworks
Bring on 2020

Fast forward to today, and I’ve built and flown several rockets. I’ve even assembled a high power rocket and I’m on the verge of launching it (just need to find a high power launch event/ location)! Assuming the flight and landing are successful, I’ll get my level 1 certification through the National Association of Rocketry (“NAR”) for high power rocketry.

It’s a fitting time to say goodbye to one year and to welcome the next one. Now is when people generally step back and take stock of where they are in life, and what they want to accomplish in the next year.

So in that spirit, below I’ve listed my major rocket-related goals for 2020. They say a goal properly set is a goal halfway reached. Right? Right??

  1. L1 cert. Get level 1 (“L1”) certification in high power rocketry, using a rocket with an H or I motor.
  2. Build an electronics bay. Learn more about electronics and build a functioning electronics bay (“e-bay”) with a flight computer for use inside a rocket, capable of dual deployment (electronically deploying two parachutes at different heights).
  3. L2 cert. Get L2 certification in HPR, using a rocket with a larger J, K, or L motor and a functional e-bay.
  4. Build a workshop. Transform backyard shed into rocketry workshop.
  5. L3 cert. Get L3 certification in HPR, using a custom-built large rocket with an M, N, or O motor.

I’m actually not even sure this is all achievable in a single year, even if I go all out and work as hard as I can. From what I understand, people who build and launch high power rockets often take years between each certification. According to NAR, only 1,677 people in the entire U.S. are currently L1 certified; only 613 currently have an L3 cert.

But that’s ok! What would be the point in setting goals if they were easy to achieve?

Set goals. Crush goals. Repeat.
Fitness goal quote? Maybe, but it applies here equally well

Let’s do this 2020!