Preview: L3 Fusion rocket complete!

I gave a brief preview in a recent post, but I’m excited to report that the L3 Fusion rocket is now finished. This is a kit available for pre-order from Scott Binder at SBR, and I was fortunate enough to partner with Scott to do a test build on his latest design.

Large white rocket with "Fusion" decal, on display on a table
L3 Fusion rocket on display

As mentioned a while back, the L3 Fusion is a larger, upscaled version of his classic Fusion rocket. It has a 5.5″ diameter airframe and is about 90 inches in length, with a 75mm motor mount tube capable of flying on an M motor. What’s particularly great about this rocket is that it combines strength with being lightweight. Its cardboard airframe weighs in at just 11 lbs when fully loaded, minus the motor.

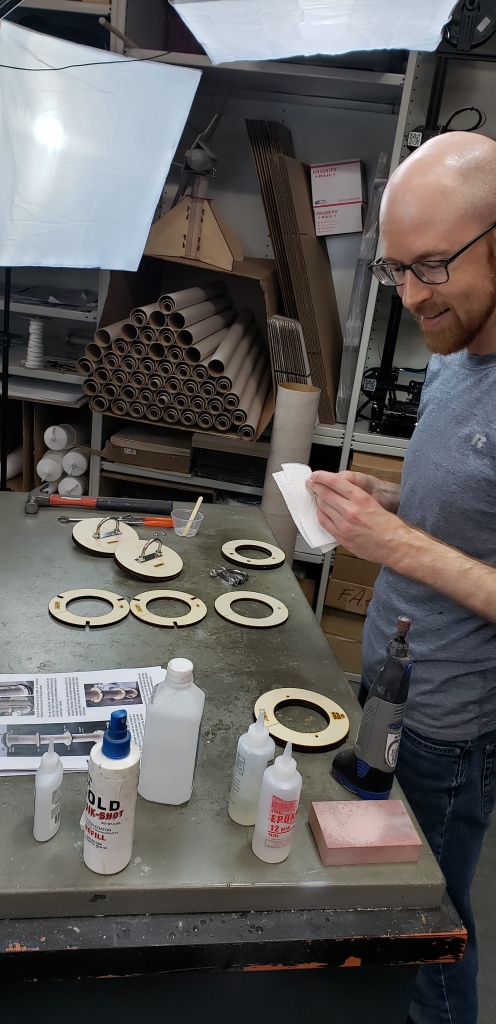
And yet it’s fully double-tubed from top to bottom, and the entire interior is coated with West System epoxy to harden and strengthen it. This thing can take a beating, and it is more than strong enough to handle an M motor.

Rocket motor parts on table, before assembly
Aerotech M-1297 motor, before assembly

I plan to fly it for L3 certification on an Aerotech M-1297 motor. Believe it or not, this will be my first time using a reloadable (RMS) motor, and my first time putting one together. I’ve previously just used disposable (DMS) motors since they’re so easy to handle – minimal preparation, and then discard entirely after the single use. But having now built the M-1297 in preparing to fly, I have to admit there’s something satisfying about putting together the motor yourself. Of course, it’s a bit messy and you’ll get your hands dirty – and the casing is not cheap – but the end product speaks for itself.

Two men standing in a workshop, holding large white rockets
Success!

In addition to building the rocket, we also set up a small studio and filmed the entire project, from start to finish. Throughout the process, I try to explain what I’m doing, though I’m far from an expert (I am, after all, just applying for my L3 certification). It was a lot to film, and as you can imagine, the video editing process is extremely time-consuming (props to Scott for undertaking this). But it should make for a great tutorial on YouTube, and I’ll post the video as soon as it’s ready!

Hiking in the PNW

It’s true that it tends to rain a lot throughout the year in the Pacific Northwest, but there are two or three months in the summer that are absolutely beautiful – warm and sunny every day, and virtually never a cloud in the sky. And as an added bonus, in some of the areas around the largest mountains, like Mt. Rainier or Mt. Olympus, there are countless wildflowers in full bloom at this time. While I’ve been focused on rocketry throughout 2020, this was a great opportunity to take a break, get outdoors, and do some hiking.

We spent a few days in Mt. Rainier National Park, and then headed up north to the San Juan Islands for a few days as well. First, in the Mt. Rainier area, we hit Naches Peak Trail. This was a great introduction to the area. It was loop trail that offered stunning views and wildflowers along the way, overlooking a beautiful lake and with Mt. Rainier in the distance (in our case, unfortunately obscured by clouds that day).

Naches Peak Trail - wildflowers
Naches Peak Trail – wildflowers
Naches Peak Trail - clouds obscuring Mt. Rainier
Naches Peak Trail – clouds obscuring Mt. Rainier

The second day, we hiked the Skyline Trail at Paradise, which is south of Mt. Rainier. Paradise is aptly named – this was probably the most beautiful hike we’ve ever done, including the immediate landscape around us (trees, valleys, wildflowers) and the proximity to Mt. Rainier, and fantastic views of other mountain chains and peaks in every direction. In the distance you could see Mt. Baker to the north, and Mt. Adams and even Mt. Hood (in Oregon!) to the south.

Skyline Trail, with Mt. Rainier
Skyline Trail, mountains in distance
Skyline Trail
Skyline Trail - wildflowers
Skyline Trail – wildflowers
Skyline Trail in Paradise

Finally, we hiked up the Mount Fremont Lookout Trail from Sunrise, which is southeast of Mt. Rainier. This trail had more of a barren landscape, but offered the best views of Mt. Rainier itself:

My wife and I, with Mt. Rainier in the background
Stunning!
Mount Fremont Trail - view of Mt. Rainier with pine trees in foreground
Mount Fremont Trail views

After three days (and three intense hikes) around Mt. Rainier, we went up to the San Juan Islands. And after that, we took one more day trip out to the Mt. Rainier area again and did the Tolmie Peak trail. But I’ll save some of these photos for a future update!

Updates: Improbable Ventures is growing!

You may have noticed a few recent changes to the website, and there are more in the works. I just thought I’d take a moment to explain some of the things that I’ve been doing.

First, the website now has a new domain, “improbableventures.org,” instead of the original wordpress domain, “improbableventures.home.blog.” Either one will work and you’ll be directed to the same website, but getting a custom domain was the appropriate next step.

Improbable Ventures with rocket
before

Similarly, we created a banner for the website last year, and it’s gone through several iterations. We’re still playing around with it and are looking forward to unveiling a new logo soon, as well.

rocket passing in front of earth
after

And on that note, you may ask: who is “we”? Improbable Ventures is growing, with two new members of the team. We’ll roll out a more formal announcement with additional info soon, but wanted to give everyone a preview of where Improbable Ventures is headed, and what we’ll be doing in the near future! Our team will be:

  • Posting more YouTube videos to our channel, detailing high power rocket construction;
  • Designing and building a high-altitude two-stage rocket, capable of flying to 100,000 ft;
  • Developing our own flight computer;
  • Machining aluminum parts, and building an all-aluminum rocket;
  • Designing and testing a liquid fuel rocket engine;

And some additional top secret projects to be announced later!

Preview: L3 Fusion rocket build

As mentioned previously, I’m partnering with SBR to build the new L3 Fusion, which you can pre-order now. We decided to film the build from start to finish, in the SBR workshop studio.

the studio within a workshop, recording me building a rocket
behind the scenes

My previous high power rocket builds have been relatively slow. Don’t get me wrong – I generally don’t procrastinate, and once I get excited about a rocket project, I dive in and don’t come up for air until it’s complete.

But my techniques are far from perfectly efficient, and there’s often a substantial amount of long-curing epoxy, and then waiting for it to cure. And then… repeat. Each cure takes hours or even needs to wait overnight, and I’m doubly and triply reinforcing everything to make sure it’s sufficiently strong. Plus I’ve only built a few larger high power rockets so far and I was inevitably much slower in the beginning.

With this L3 Fusion build, however, I was able to move at a much more rapid pace. One big reason was using a fast-curing 12 minute epoxy. You just mix the resin and hardener and get to work. With a 12 minute cure, it’s amazing how quickly you can build!

me building a rocket, in workshop studio
yes, yes… this feels about right

That being said, for purposes of filming every step, this was still a marathon build session. It took a couple days of nonstop construction, even though the steps themselves are pretty simple and there was nothing that I hadn’t done before. At least, in principle. The “marathon” aspect was only because of filming and trying to make the most efficient use of our time.

We did have a few minor technical difficulties. Despite an excellent studio setup with a camera and tripod, external microphone, bright lights, and so on, there were several long stretches where we captured excellent video but the audio was completely missing. This meant we had to go back and figure out what went wrong with the microphone (troubleshooting this was much more difficult than you might think) and then re-shoot some of the steps. This turned out to have a silver lining, though, because the second time through I was substantially less inept than my initial attempts. Still inept, that is, but less so.

me building rocket with parts on workbench
enjoying the build

All in all, this was a really cool project, an awesome rocket build, and a successful video shoot. As soon as we’re done with the editing and have a final product, SBR will share the video on its YouTube channel (and I’ll share it as well, on my channel). In the meantime, if you’re looking to embark on your L3 certification, I highly recommend that you consider this L3 Fusion rocket!